
i stole the following 2 photos from the blog to share here too...... Thank you!
a small group of us were armed with packs of white cardstock and asked to make flowers. usually when i cut paper to create a lot of flowers it goes straight into a ziploc bag for a class kit. so this was a treat to cut out petals and flowers and then get to use all of them myself! my fingers were sore. and dirty! who knew clear glue and white paper could make your finger tips so black?!
we met with our flowers and then made more.
then we added glitter. and more glitter. which made our finger tips look like some kind of scary halloween costume. we will be finding glitter all year i think! when i left the store last night, i noticed a trail of it leading from the door to the garbage disposal area. it glittered in the light from the street lights.

i can't wait to see it amongst all the other beautiful trees at the festival.
i wish i had had the time to count the variety of flowers we made. there were so many different styles.

i have to toot a horn for Jan. she made this bird from scratch. it is incredible.
anyways, it was a lot of fun to be a part of this project.
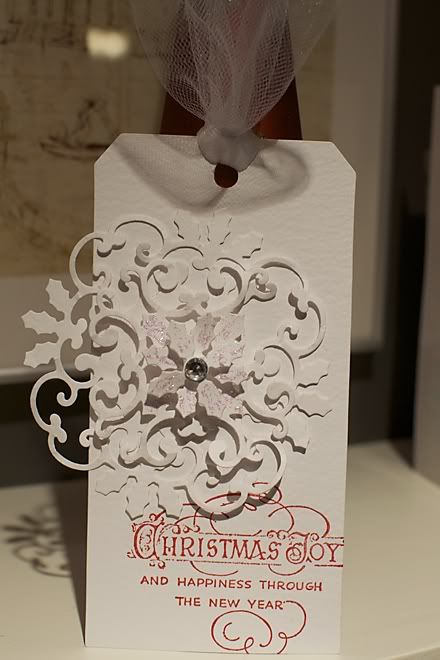
this is a very simple tag that i created for our Make and Take last night.
Spellbinders has some amazing dies available. they are well known for 2 types of products:
1. simple and elaborate shapes that nest into one another. easy to cut a decorative mat for a photo or greeting and have the photo or greeting have the same shape.
2. embossed edges. you do need a special rubber spacer for this, but the effect is amazing.
for my tag i just used the dies to cut. however, during the demonstration i also used the embossing mat to emboss. for a third usage of the dies, i also demonstrated how you can use the die as a mask for inking. of course i don't have pictures of that result.
to cut:
place the die against the paper you want to cut. most of these dies are open in the inside, so it is easy to get the exact cut from a desired part of your cardstock. use a bit of tape or one of the Spellbinder Magnetic spacers to hold the die in place. because these dies are thin, you will need an adapter plate or a few thick layers of cardstock or chipboard.
to emboss:
immediately after cutting, DO NOT remove your paper from the die. lay the Embossing Mat against the paper side and run it through your machine again. you will need to remove the adapter plate. for the Cuttlebug, we needed to add one layer of chipboard when we ran it through our machine. i have not tried this step with my Vagabond or a Big Shot, but i suspect it will be similar.
to ink:
for this step you don't have to emboss your shape, although the embossed image with the ink looks stunning. again, don't remove the paper from the die just yet. lay the die down so that you are facing the metal die side. keep in mind that your RIGHT SIDE of the paper is INSIDE the die. take a look at the die (use the pictures on the die package to help if needed) and ink the areas that have a decorative shape. then you can remove the paper! a few of the customers suggested that spray ink would work as well. i think that would be a neat effect! not all of their dies are meant to be inked...just check the image on the package to see if it is possible. the areas meant to be inked will appear a slightly darker tone than the rest of the image.
i hope that helps! i am definitely not a Spellbinders expert. the Spellbinders website is very helpful. they have videos, instructions and a huge idea gallery for more help. they also have a comparison chart of all the machines and exactly what layers you need for each step. i love that inside their die packaging they have a simple set of instructions for the major die cutting machines.
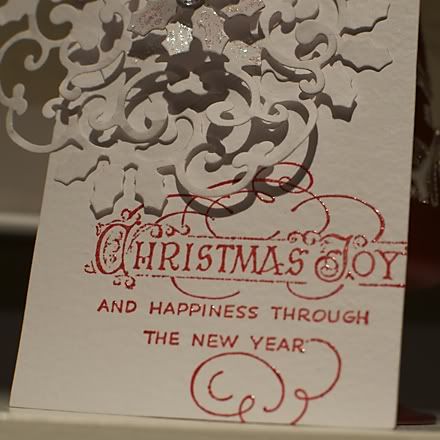
i layered all the images from the Holly Motifs set with foam pop dots. a few crystal stickles added some sparkle and a clear rhinestone in the centre completed it.
the stamp is from Stampendous. i used Festive Berries from Tim Holtz' Limited Edition Christmas colours. then i embossed it with clear embossing powder. although it is a dye ink, it stays "wet" for a long enough time to emboss it easily.
a final tip. the intricate scrolls on this set of dies was crazy tough to get out of the die. i have never had this kind of difficulty with any of their other dies, and neither had the other girls. we learned the most amazing trick to get around this problem....maybe it was just the set i had, or perhaps it involves any intricate die? we used a few layers of WAX PAPER and ran it through the Cuttlebug with the die. so simple, and the following shapes came out without any difficulty. the wax paper die cut image actually looked really neat too!
in fact, wax paper works with paper punches too. if they are sticky. aluminum foil helps sharpen your paper punches. the key is to use several layers when you punch.
We saw the tree last night...beautiful!!! We all voted it best tree!!!!
ReplyDelete