Showing posts with label Christmas. Show all posts

Friday, 30 December 2011

must be holiday time!

the last week before holidays was busier than i expected. i knew the start of the week would be busy, but i thought it would slow down. i thought the same thing last year. and the year before that. perhaps next year i will be ready?!

never mind the last week of school was also the last week before Christmas. we'll just say that Christmas Baking became a low priority. yes. very low. which i am beginning to appreciate now.

last Monday we were entertained by the kindergarten classes. Kiara is the child in our family who loves the stage. she looked very cute in her pretty dress.

Tuesday brought the grades one to three performing their version of the Polar Express. they were amazing.
Aidan has never been the "on stage" kind of kid. it is neat how he has grown in this area over the years. we were very proud of how well he did that night.

on Thursday it was "International-Traditional-Heritage" dinner for the kindergarten class. it was interesting to see (and taste) the different ethnic dishes. not sure if was the untimely flu, or a result of the dinner....but Kiara's teacher was sick on the last day of school. poor woman!

Friday was all school pyjama and bring your favourite teddy bear to school day. i ended up running back to the school and retrieving Kiara's forgotten bear....phew!

by Saturday the kids could barely contain themselves with excitement for Christmas. we barely made it to our church' evening Christmas Eve Candlelight service. it was also packed. then we squeezed in a supper of appetizers before heading to a friends house. at which Aidan lost a tooth. yes. only Aidan. not only was Santa making a secret appearance at our home that night....but we also had to be sure to be ready for the Tooth Fairy. for real. i can't make this stuff up. fortunately all parties made it and the Tooth Fairy took advantage of the stockings to leave a toothbrush for BOTH kids as well as a special financial deposit for the missing tooth.

Christmas Day was a fantastic day for all of us. we were thankful to be healthy and happy. all gifts were well loved. Santa made another appearance that morning. he actually woke us up! the kids are not so convinced that this Santa is the real deal. it is amusing listening to them try to rationalize the visit.

i had hoped to be finished my January layouts BEFORE Christmas Day. had them on my table and everything. even the photos were ready and printed. no such luck! i did manage to find some time in the past few days to tackle them. phew!!

here is a sneak peak of the January Year in Review page....

Photobucket

recognize the papers?

Little Yellow Bicycle Winter Twig. oh. it is so lovely.


i was inspired by this sheet. the pine cones. the lace. the snowflakes.

nearly a year ago, they designed a collection called "Twig". it was also incredible and sold out very quickly. they re-designed the same collection again with a winter feel. i think they have another winner.

starting on Monday i will explain the Year in Review class. i'll share the layouts from the past year. and....i'll share the layout that will start of the 2012 Year in Review album. i can't wait!!

for now, i think i will enjoy having time to take photos of us enjoying the remainder of the holiday. as well as squeezing in some more games. love this part of the holidays!

i hope you had a very merry Christmas too. and that these last few days of the year are relaxing and enjoyable and healthy.

Merry Christmas!

Friday, 2 December 2011

Friday Fun Day

some of my readers will have read THIS post on the URBAN SCRAPBOOK blog.

                                                                    i stole the following 2 photos from the blog to share here too...... Thank you!

a small group of us were armed with packs of white cardstock and asked to make flowers. usually when i cut paper to create a lot of flowers it goes straight into a ziploc bag for a class kit. so this was a treat to cut out petals and flowers and then get to use all of them myself! my fingers were sore. and dirty! who knew clear glue and white paper could make your finger tips so black?!

we met with our flowers and then made more.

then we added glitter. and more glitter. which made our finger tips look like some kind of scary halloween costume. we will be finding glitter all year i think! when i left the store last night, i noticed a trail of it leading from the door to the garbage disposal area. it glittered in the light from the street lights.


i can't wait to see it amongst all the other beautiful trees at the festival.

i wish i had had the time to count the variety of flowers we made. there were so many different styles.


i have to toot a horn for Jan. she made this bird from scratch. it is incredible.

anyways, it was a lot of fun to be a part of this project.


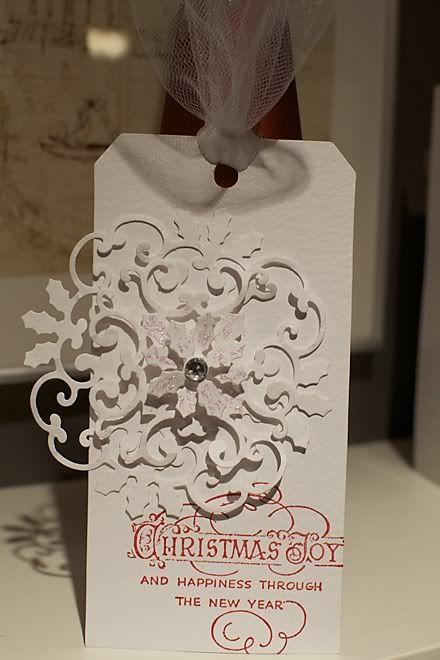
this is a very simple tag that i created for our Make and Take last night.

Photobucket

Spellbinders has some amazing dies available. they are well known for 2 types of products:

1. simple and elaborate shapes that nest into one another. easy to cut a decorative mat for a photo or greeting and have the photo or greeting have the same shape.

2. embossed edges. you do need a special rubber spacer for this, but the effect is amazing.

for my tag i just used the dies to cut. however, during the demonstration i also used the embossing mat to emboss. for a third usage of the dies, i also demonstrated how you can use the die as a mask for inking. of course i don't have pictures of that result.


to cut: 
place the die against the paper you want to cut. most of these dies are open in the inside, so it is easy to get the exact cut from a desired part of your cardstock. use a bit of tape or one of the Spellbinder Magnetic spacers to hold the die in place. because these dies are thin, you will need an adapter plate or a few thick layers of cardstock or chipboard.


to emboss:
immediately after cutting, DO NOT remove your paper from the die. lay the Embossing Mat against the paper side and run it through your machine again. you will need to remove the adapter plate. for the Cuttlebug, we needed to add one layer of chipboard when we ran it through our machine. i have not tried this step with my Vagabond or a Big Shot, but i suspect it will be similar.

to ink:
for this step you don't have to emboss your shape, although the embossed image with the ink looks stunning. again, don't remove the paper from the die just yet. lay the die down so that you are facing the metal die side. keep in mind that your RIGHT SIDE of the paper is INSIDE the die. take a look at the die (use the pictures on the die package to help if needed) and ink the areas that have a decorative shape. then you can remove the paper! a few of the customers suggested that spray ink would work as well. i think that would be a neat effect! not all of their dies are meant to be inked...just check the image on the package to see if it is possible. the areas meant to be inked will appear a slightly darker tone than the rest of the image.

i hope that helps! i am definitely not a Spellbinders expert. the Spellbinders website is very helpful. they have videos, instructions and a huge idea gallery for more help. they also have a comparison chart of all the machines and exactly what layers you need for each step. i love that inside their die packaging they have a simple set of instructions for the major die cutting machines.

Photobucket

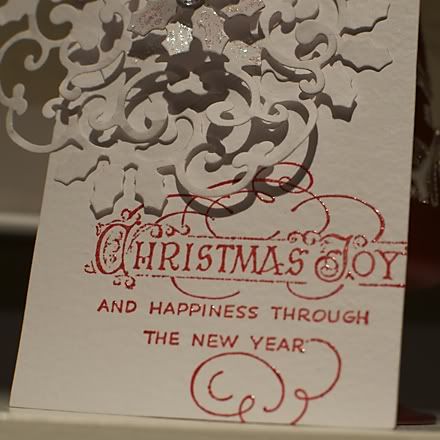
i layered all the images from the Holly Motifs set with foam pop dots. a few crystal stickles added some sparkle and a clear rhinestone in the centre completed it.

the stamp is from Stampendous. i used Festive Berries from Tim Holtz' Limited Edition Christmas colours. then i embossed it with clear embossing powder. although it is a dye ink, it stays "wet" for a long enough time to emboss it easily.


a final tip. the intricate scrolls on this set of dies was crazy tough to get out of the die. i have never had this kind of difficulty with any of their other dies, and neither had the other girls. we learned the most amazing trick to get around this problem....maybe it was just the set i had, or perhaps it involves any intricate die? we used a few layers of WAX PAPER and ran it through the Cuttlebug with the die. so simple, and the following shapes came out without any difficulty. the wax paper die cut image actually looked really neat too!

in fact, wax paper works with paper punches too. if they are sticky. aluminum foil helps sharpen your paper punches. the key is to use several layers when you punch.

Friday, 25 December 2009

Merry Christmas

we are enjoying a wonderful holiday in our home. we are all so thankful for our good health and awesome spirits.

Aidan woke up this morning and was completely thrilled with how the living room looked with the fully lit tree and filled stockings. he said, "Mom, you just have to come and see it!!!"


it was a beautiful sight. too bad we can't look at that every morning! then i'm reminded it would lose it's uniqueness and be less special if that were the case.

another incredible site was the view this morning. it has been snowing for weeks now. there are loads of snow piled everywhere you look. but this morning the entire surface was covered with a really thick hoar frost.

Photobucket


Photobucket

Aidan was given his own point and shoot camera this year. he was pretty excited over it. the two of us went on a photo walk to capture the frost.

Photobucket


i regretted not bringing my macro lens by the time we got down to the pond. it was a unique site, with piles of snowflakes scattered across the surface of the scraped ice. my regular lens didn't do too badly.


Photobucket

i cropped this image down, and added a festive border. because i could.


Photobucket

this one was not cropped at all.


Photobucket

neither was this one.

aren't those snowflakes incredible?


i hope that you are enjoying your Christmas. Merry Christmas!!!

Tuesday, 22 December 2009

add this one too!

after i published yesterdays' post, i knew there was something i was forgetting.

i meant to add Wilna's Christmas tags to the list.

she is amazing with her sketches and watercolours. then she turns some of it into digital stuff. last year my blog header at Christms were some that she made and shared with the internet world.


then for today's note...

i am sooo making some of these:

version one by the shutter sisters. totally digital!


version two hybrid posted at ki memories.


great last minute christmas gift?

Monday, 21 December 2009

christmas tags

in Christmas' past i used to spend a lot of time wrapping gifts.

not that they were hugely decorated. i simply spent more time thinking about the ribbon and paper. every year was different. some years it was just 2 colours, others it was an assortment of tones.

i guess there was my Costco phase and my pre-Costco phase! most years (pre-Costco) i bought the wrapping paper a year in advance at 75% off at stores like Hallmark.

then there was the spring i discovered Liquidation World. 75% off ALL THE TIME. i found gift tags.

now you can often find designers sharing their home made gift tags on line.


the 80's me has some in english and swedish. LOVE them. i'm thinking they would be perfectly adorable in an album. downloaded and saved. yay! thank you. (came across them on the CraftGossip blog....and will be visiting her site more often now) she also showed a cool tip for distressing. a brown spray ink is awesome for adding a vintage look....if you get a spot of it somewhere, it can look like a coffee or tea stain. in my case, i need to spray the ink before i run it through my printer if i want a crisp look.

there are a few at WorkInProgress blog.


and these made my Crystal Jeffrey Rieger at Scrapbook and Cards Today blog.  (again CraftGossip pointed me in the right direction. how did i not know that site existed before?!)


after viewing tag after tag available online, it suddenly dawned on me that i had not made home-made tags for many, many years. i think it is time to start doing that again. next year! since our presents are already wrapped and ready to go.

Monday, 14 December 2009

sweet memories

i'm noticing a trend....i seem to be a year behind in my photos! ha!!

i'm not bothered by it, but i thought it was interesting. although we do enjoy looking back and remembering what we did exactly one year ago. i have finally picked a few of my favourite photos form 2009, so i could definitely arrange to do some printing of them. my husband chose a printer that can print great quality photos. however, i still prefer the professional (aka - Costco) printing method. although i am slow, it is a part of the process that really does not work that badly for me.


so, about a month ago i was asked to make A project for the Making Memories blog. selected from several Facebook Fans. it was a DREAM COME TRUE for me. i have been using Making Memories products since i first started putting layouts together. the very first layout of Aidan had their pewter metal letters on it. good memories. literally!


those who know me well, know that i tend to be very hard on myself. i am learning to take it easy on myself, but it is taking time. i spent several days thinking about projects. cards came to mind, but i wouldn't consider myself hugely inspirational in that department. a layout was obvious. then i decided the paper was perfect for a little mini album. i started that. then i had a cool idea for canvas, so i worked on that. finished my canvas. then i decided that i really HAD to do a layout. yes, i know. so NOT typeA!! if i was miserable about it all, i would not have been so eager. however i was having fun and i still had so much of the product left over! it is a good thing when you love the paper and such so much that you don't want to put it back on the shelf!! i think i would have kept going, but i had another deadline for another project approaching too. yes, i still have lots of goodies left for a few layouts...and maybe some cards after all.


Photobucket

i love the postage stamp style background paper. i tried to break up the busy-ness of it with some more solid colour matting.

the filmstrip overlay is actually done digital. yes, a hybrid layout!

just last week i discovered that Tim Holtz is now producing tiny frame filmstrip acetate RIBBON! it would have been too small for these photos....however i could have used it as well.


Photobucket

my personal favourite is hidden journaling. you can see here that i also did some sewing to help form the pocket behind my main photo.


Photobucket

and the tag was actually a page from their journaling pages. i did a naughty or nice comparison of my kids!

Kiara was just a bit too young to do the decorating....but she had fun eating or stealing the candies as soon as Aidan added them!


Photobucket

i took one of the vintage findings clear glass pins and bent it to be a hook for the key. it worked very well.


well, one more week of school. and a crazy one at that. Christmas concerts galore this week! as well as the Christmas parties. i need to do some more Christmas baking....after i go shopping for more eggs and butter. wrap the presents for the teachers and the bus drivers....mail out the Christmas cards.

fun times!!

Saturday, 12 December 2009

more details on the Holiday Traditions Album

there were a few requests to see more photos of this album. here they are!

i am thinking of doing a tutorial on the album as well. i just have to finish up some baking and Christmas stuff around the house that i've put off for far too long!


it really is a simple album to put together. i did have to figure out a few measurements before i started. for instance, i wanted to have square pages, close to 6x6. then i had to figure out the measurements for the cover. that is where i got my 6x12 size...then just worked backwards from there.


Photobucket

this might give you a better view of the front when the cover is open. i think you  could get away with using cardstock without the double fold. however, if you have some gorgeous patterned paper that is on the lightweight side....it would be amazing folded over!

i added the acrylic journal pages after the album was assembled. some clear glue on the edge of the journal sheet, then slipped into the spine....voila! learn from me, add the inside acrylic page first. you can see i put on a bit too much glue initially when i started with the top acrylic page!!


Photobucket

i think that perhaps the spine is the most confusuing to understand. here you can see how i stitched it. it also gives you an idea of the bulk of the album. {already the corners of the cover are getting use! maybe a photo corner or a strip of ribbon would help reinforce this well-used edge.}


Photobucket

another angle.

Photobucket

this image shows you the off-centre stitching. i also stitched the spine twice (backstitching).

it also shows you how the cover fits into the spine. like those matchbooks you used to get from restaurants. the left portion is already tucked away....while the right portion is still being slid into the space.


Photobucket

opened to the middle pages of the album. remember that the red pages consist of the album. it is only 2 pages. which means you get 4 pages to decorate. you can see the acrylic journaling page in between these pages. this album was not made to lie open. if i wanted that i would have used lightweight papers....i think that would have worked. or perhaps a larger size too.

mini album - pocket that holds recipe cards

this is the same photo i showed yesterday. you can see the stitching across the top and the bottom on the centre page. i cut the page to 4x6, adhered it with a tiny bit of adhesive to prevent it from slipping when i sewed. i left the sides unglued, so that the recipe cards can be slid in easily.

Photobucket

here is the view of one of my recipe cards. i added my recipes and pictures first, then i added some embellishments.
Photobucket

here is the view of the other 3 stacked on top of each other. sorry, i didn't take photos of each of them individually. hopefully this will give you enough of an idea how they looked!


i had the best time making this album. yes, that included the measuring and decisions! if you make one, please send me the link to your photos. i'd love to see other versions. different holidays. different sizes. if you have any more questions, please ask! i will totally try to do another album before the month is over. this time i'll take photos as the album takes shape and then share the tutorial here.

and if you are new here...i also posted the instructions on my blog yesterday (with measurements). i also included jpegs of the recipes that you could print out at home.

enjoy!

Friday, 11 December 2009

holiday traditions mini album

soooo excited to be the guest designer on the Making Memories blog again today!!!

{i'm really loving this happy dancing!}

i really loved Making Memories FaLaLa collection from last Christmas. i did not think they could beat it. i was wrong. their Mistletoe collection is truly incredible and fun to create with. little felt embellishments. felt snowflakes. and those amazing trees...on an entire sheet of 12x12 paper and trims!! i loved cutting out the trees from the paper and i used lots on my projects. (peaceful while i watch my favourite tv shows in the evening)


my other currrent favourite of theirs is their entire Vintage Findings.
{dear santa.....you know i've been good!! wink, wink! i'm sure much of it would fit into my stocking this year}


this project was something i had been thinking about doing for awhile, and i thought that the Mistletoe collection would be perfect. it totally inspired me to put together my collection of our holiday favourite traditions. it's kind of like a large matchbox album. it has a few pages for photos and notes. in the very centre is a "pocket" that holds 4 pages of recipes and even more photos.
Holiday Traditions Mini Album

it will even stand up on it's own when the cover is closed.
Holiday Traditions Mini Album (open

open album. you can see the red pages that hold the photos. i also adhered some clear transparency pages. {i think they have little journaling books for most of their collections. they are very handy!}

to make the cover:

(1) trim cardstock to 6x12.
(2) make score lines at approximately 3/4 inches, 1 1/2 inches and then two more at 7 and 7 1/4 inches.
(3) fold the first score line toward the long side of the paper, then make the next fold under that one (double fold). this will become the "spine" for your album.
(4) fold the second score lines (7 and 7 1/4) towards the "spine". they should be able to tuck under the the edge of the spine to keep the album closed.

don't put it away just yet, we need to make the interior pages and do some sewing!

mini album - another view of interior

another view of the interior pages. just so you can get a feel for the mini-album.


to make the "pocket":
trim another piece of cardstock to 4x6 inches. adhere to the centre back section of the cover. i used my sewing machine to stitch along the top and bottom portions of the pocket.

to make the "album" pages:
(1) trim 2 sheets of paper (could be cardstock or a lighter paper). to 6x10 1/2. score and fold each at 5 1/4 inches.
(2) tuck the cut edges into the spine, even with the sides.
(3) use your sewing machine to straight stitch along the spine to bind the pages and spine together. your line of stitching should be slightly off centre towards the left. (with some patience, you could do this by hand with a paper piercer and a threaded needle. for me, sewing is easier and faster)

the base of the album is now complete!


mini album - pocket that holds recipe cards

here you can see the "pocket" i created in the centre of the last page. i pulled out a few of the recipe cards to show where they are hidden.
to make the pocket inserts:
(1) trim 4 pieces of cardstock to 4 1/2 x 5 1/2 inches.
(2) to mark out the placement for the tabs, i found the centre of the page. then i divided each half again, making the page into a quarter. light pencil lines help with this! (measure on one page, then transfer to the other 3)
(3) i centred the punch between the "quarter markings" to cut holes in the edges of the cardstock. only slide the paper punch halfway into the paper, to form a type of tab.
(3) these sheets will stack together and then slide into the centre pocket.

mini-album - view of pull out cards


i pulled them out, so you can see more of the details. i did not add any thick embellisments because you don't have a lot of room for that. i also made them out of cardstock...they need to be durable enough to get pulled out when needed.

at this point you can start the fun stuff and decorate to your heart's content! this type of album is more suitable to "flat" layouts. the bulky stuff will work great on the cover, but not the inside. i love the word-fetti. it was used on almost every page! as well, the Making Memories glitter alphabet stickers (in red and green) are awesome here.

i know we'll treasure these easily forgotten traditions in the years to come. another reason why i scrapbook!!

i designed the recipes in Adobe PSE7, then printed them out on my printer at home. i selected a few sweet treats that we all enjoy making and eating at Christmas.


click on the images below, and you are welcome to use them in your own albums. {or kitchen!}
recipes part 1

recipes part 2

just to note! i am a cook and baker....but i have no skill in creating my own recipes. my best skill is to have awesome friends who share their favourites with me. {when i typed out the recipes i noticed that 2 friends contributed the most to our favourites....both with the name Joanne. interesting coincidence.} the sugar and gingerbread cookies will be the best you have ever eaten. and the icing is also incredible. Joanne C also gave me the most amazing whipped shortbread recipe. can't go wrong with butter and icing sugar!!

i'll share it here:

Whipped Shortbread (by Joanne C)

1 cup butter
2 cups white flour
3/4 cup icing sugar

combine all the ingredients and beat for 10 minutes. preheat your oven to 350F

i use a cookie press, so this is more firm and suitable for it.
{i make "trees" then add green sugar sprinkles. or i make "poinsettias" and add red sugar sprinkles. i am also in the market for a new cookie press....maybe there are more shape options?! i am hoping for a snowflake.}

if you don't have a cookie press, and just want to drop them on your cookie sheet. add 1/2 cup less flour and 1/4 cup less icing sugar.

cookie press cookies only need to be baked for 10-12 minutes, while the dropped cookies will need 17 minutes. when the bottoms are lightly browned, you know they are done!

Thursday, 10 December 2009

Christmas is coming!

here are a few blogs that are inspiring me during the holiday season.


Tim Holtz - 12 TAGS of Christmas
for 12 days, he is making a tag each day and posting the steps in detailed photos. they are very cool. the kids and i check this out while we eat our lunch these days.


Crop Suey
this is a local scrap club and store. she happens to be a friend of my cousin. {hugs to you Nicki!!} Bree is very fun to watch her demo stuff.


Nadine at Delight Designs
she used to work at my LSS when i first started scrapbooking. not sure how well she remembers me. i ran into her last year and she remembered Aidan as a baby (yes, of course i had to re-introduce myself...one of those things i do if i remember a face). when he was a few months old, i had this awesome "elf" hat that he wore with matching mittens. she loved that set! she also giggled with delight when i brought him in. she is super talented and is making some fantastic stuff...and sharing her techinques.


The Girlfriends Club - Candy Cane Fridays
Leah, Johanna and Donna. the kids LOVE these videos. i always wish i was right there scrapping with them...they always have so much fun!


we have never had a video camera. i'm not sure the kids would know how to react to one. Aidan told me a few weeks ago that he wanted to teach others how to "craft" when he was grown up. with videos. hilarious!! so, now when we do crafts together, we pretend we are making a video. fun times!!

Monday, 30 November 2009

advent is here!

is it really December ONE tomorrow?! anyone else feel like November disappeared in the wink of an eye?


i am just getting our advent calendar ready for tomorrow. (last minute!)

candy is taking a major back seat in this department. the kids still have a ton of their halloween candy left over. instead i am filling it with activities. they love to do crafts and baking and out of the ordinary stuff. this also helps me from being overwhelmed with their "can we" questions! Aidan has already been asking to decorate the house for weeks. we still don't have a lot of the regular house decorating done....which should make it really interesting for the Christmas component!


Photobucket

print out a copy of the activities if you like.

i am still deciding on the December Daily album too. i really love looking at the one i made last year. i know i'll be taking pictures...it's just a matter of making the decision to put them all in one place. perhaps the final decision will make itself known...in other words, we'll see what kind of spare time i can find!


what are you doing to help you get into the spirit of Christmas?

Monday, 23 November 2009

doing a happy dance

because of a Christmas Canvas!


Photobucket

less because of the canvas...and more because it was featured on the Making Memories blog today!!

i am still in a bit of shock. only because i have a lot of respect for this company. a lot of their products have been in my first scrapbook pages, and the ones i have created recently. seriously, have you checked out the Mistletoe collection? i also loved how their Vintage Findings are truly vintage and can work with any of their collections. can you tell i am just a bit of a fan?!
the basic instructions are posted on the MM blog. here are more detailed ones, with photos.

i used 3 8x8 canvases, 8 eyelets (like you would use on a frame, can can get a package of these at the dollar store), 8 large jump rings and 4 glass links (from the jewelry section).
i also used acrylic paint (i chose 3 colours, but just one would work too), with water, paper towel and a foam brush.
Antique Linen distress ink with water and a foam brush.
i used a 12x12 sheet of kraft cardstock. i did have to cut it down to letter size so that it could go through my printer.
and lots of MM products!! an assortment of their Mistletoe papers (they're double-sided, so i did use both sides of some of them), the box of trims and treats (had ribbon, buttons, gems, clear glitter die-cuts, and those lovely felt snowflakes!), and dimensional stickers. also a few gem pins from Vintage Findings.


here we go with the detailed steps:

marking canvas for eye hooks

screw in the eyelets. 2 of the canvases will only need one side to be done (top and bottom). one of the canvases (middle) will need to have eyelets on both ends. i started with one canvas, then used my ruler to mark the spots on the other two.

insert eye hooks


canvas - painting background

i was really inspired by the "plain" side of the "Big Dot" paper. i decided to paint the canvases to get the worn paint look. i chose to go quite light, but i did think about using a crackle effect too.

i chose green, red and cream acrylic paints. i used a combination of a dry brush and some watered down paint too. if it got too heavy, i wiped it away with a ball of paper towel. thankfully this paint does not dry quickly, so you have lots of time to fix anything you don't like. it was fun because it wasn't something that needed to be perfect.

canvas - ink background after pain

after the paint had dried i used some distress ink and water on top of the canvas. it just added some antique-ness. (made that word up!) i also used a foam make-up sponge on some edges to darken it even more. again, lots of ways to do this. just have fun! (yes, i said that twice. it is important!!)

canvas - ready for paper

here they are all lined up. as a final step, i went in again with some paint on a dry brush. i decided i neededs some darker spots! i also went in with some gesso to lighten other areas. (white acrylic paint will do the same thing)


using Adobe PSE i typed out a Christmas poem, then printed it on the kraft cardstock.
i trimmed it into 3 fairly equal rectangles. (if you want to print it out, clicking on the image above should allow you to do it.) any edge punch of your preference adds some nice detail.

canvas - distressing

i decided to decorate each canvas a little differently. 2 of them have this technique:
cut out equal sizes of kraft cardstock and the MM Mistletoe paper. (i used a square paper punch on one, and on the other i just measured with my paper trimmer) use Making Memories edge distresser and then some ink on the edges. then sew a straight stitch using your machine! you could also use MM paper piercer and stitch by hand too. after the 2 pieces are sewn together, use your bone folder or stylus or fingernail to roughen the edges even more.

canvas - sewing layers

you can see in the finished square the roughed edges. i liked the worn look with these papers!


connection of canvases

after the canvases were fully decorated, then i connected them with the jump rings and glass links. use small jewelry pliers for this.
close up of canvas 1

here is a close up. i didn't take the backing off of the adhesive glitter die-cut tree. instead i glued it to the green tree! i REALLY loved the "Tree" paper. i lost count of how many trees i cut out individually. very relaxing to do in front of the television one evening. i added a gem to the top of the one tree.
close up of canvas 2

i need more of these snowflakes. they are so adorable!!! i want a package of just a hundred little white felt snowflakes. of course i'll use some and hoard the rest for next year, and the year after that, and the year after that....they won't go out of style!


close up of canvas 3

in the end, i added a couple of the gem pins from the Vintage Findings collection. are they not adorable too. they do come in their own package, and i may need to buy more of these. yes i am totally serious!


thanks Making Memories for making my year! this was like the Christmas present that no one could have afforded to buy me. yes, i'm still doing the happy dance. thanks for letting me share my little idea from my scrapbooking world.

Friday, 20 November 2009

Christmas Cards....again!

i made a pact with myself.

"must use all scrapbook supplies and not save for a special project"
i remind myself of it often.


time to pull out the papers and put them to use before they fall apart on my shelves! seems silly to not use paper because i love it too much.

Photobucket

i really love double sided paper like this for cards. the solid colour is light enough that you can still write your greeting on the inside. yes, i could have gotten more creative....but i had to whip these babies out quickly.


Photobucket

these all have plain ordinary white cardstock as the base.

these are card sets for a playschool silent auction. just like the ones in the previous post. 18 cards in an afternoon. not a bad record.

i am still trying to figure out  my own style. trying to see if i actually do fit into a style! i prefer to think of my work as the style of the month. at least it seems to sway and change like the weather here in Alberta.


did i mention anything about my card evening with the ladies church group? i designed 3 cards for the ultra low cost of $5 per set. it was done. i liked how they turned out. of course at that cost, the only supplies you get are for the cards and no extra stuff to take home. they also got a great deal because i brought many of my own tools to share....since not too many of them do this on their own. i cut out every sheet of paper including some decorative edges with my paper punches. everyone had the same stuff to work with.

here is where it got interesting.

if you think of everyone having the same supplies....then all the cards would have been identical.

nope! not this time.

a few cards were identical to my samples. but the majority were not.

i think it was AMAZING how these ladies {many who claimed to not be creative} managed to come up with very unique cards! the paper was double-sided, so that helped. i did bring an assortment of stamps. papers were trimmed a bit more, or cut with decorative scissors or folded differently....more or less ink used.

it was a fabulous reminder that making cards or scrapbook pages is an expression of the person creating them. there is no right way to do it!

celebrate!

they worked away. sometime chatting and laughing. sometimes being so silent that the only noise was paper being cut or folded. {did i mention there were 24 ladies in the room?}

i love that they left refreshed and happy. not once did i hear someone say that they did not like their creation. how wonderful that they felt confident enough to celebrate their unique styles.

it was inspiring and filled my creative brain with more ideas to keep them sharing and accepting themselves (and each other!)


it isn't just about the paper. it is also about the HEART.

LinkWithin

Blog Widget by LinkWithin