
this has been an odd week for January weather. apparently my memory is not as bad as i thought...since weather records agree with me! i don't recall ever having snow melting at this time of January in this part of Alberta. even today was supposed to be back to normal....but it is pleasant outside.
right now the sun is shining....but i can see some clouds on the horizon. snow is in the forecast for today. i expect we will not be disappointed. it has only been 24 hours since we shovelled the last snowfall.
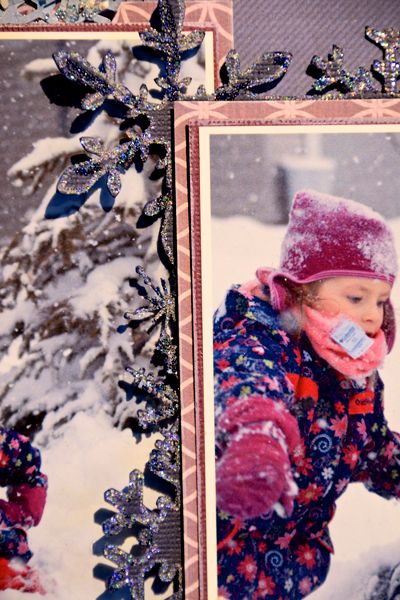
my children are still young enough to fully anticipate the joy that a snowfall brings. here they are enjoying a snowfall from last January....
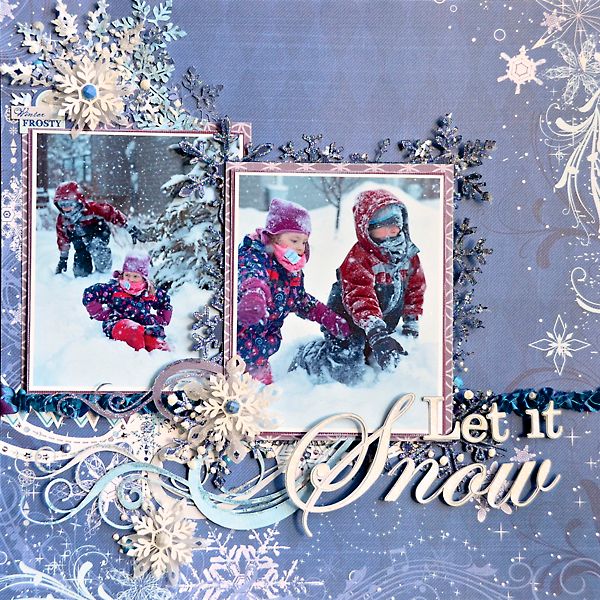
Canadian winter...toques pulled down low....scarves pulled up high....even in their winter disguises, we know they were enjoying themselves.
this layout was designed using products from Urban Scrapbook January monthly kit. it just calls for pretty snowflakes!
i just finished the recent Silhouette course offered by Kerri Bradford. i followed her tutorial on assembling an entire page using the Designer Software and made a couple of pages. for a challenge i decided to see about doing the same with this page. i loved it! i imported the papers from thumbnail images and used them to try out the colours digitally before i cut into the paper. since i change my mind a million times, this actually saved me time. i got the sizes right and then even had the sketch on my computer screen to refer to. not only do i change my mind, but i am also prone to forgetting some of my design ideas. this kept me focused!
as always, my design did change from my digital mock-up to my final page. digitally, all elements sit straight and even....there is no need to tweak with foam pop dots or other tools. i love the ease of digital but can't live without getting my hands covered in ink and glue...or creating a mess to clean up when it is all over. digital pages always look too "perfect" in my opinion.
i created this snowflake frame using the Silhouette software. first i created a rectangle...then welded snowflakes all around the edges. not difficult to do and this can be done without the designer edition.
i added fine iridescent glitter to the outer edges of the snowflakes. then i added some clear microbeads. they magnified various bits of the glitter even more.
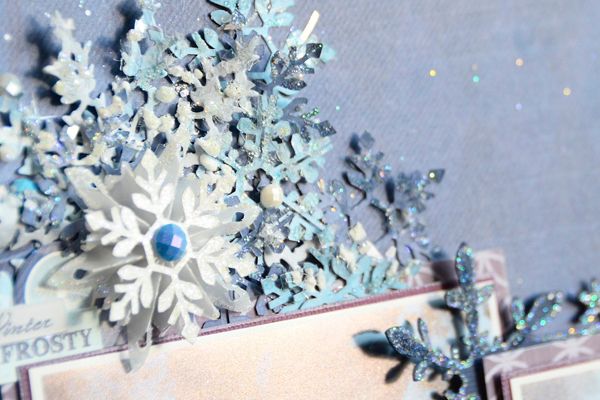
in my original digital design i had created lots of little snowflakes to create a background effect. looked fabulous on my computer screen. i was not nearly as fond of it in real life. but they came in handy as i later added them in piles to the top corner of the layout.
i added more glitter. some microbeads. then i added some dimensional white paint. then more glitter! on this portion i also added some tiny clear glass fragments too. it really sparkles in the sunshine.
the little prima crystals were the perfect colour for the papers too.
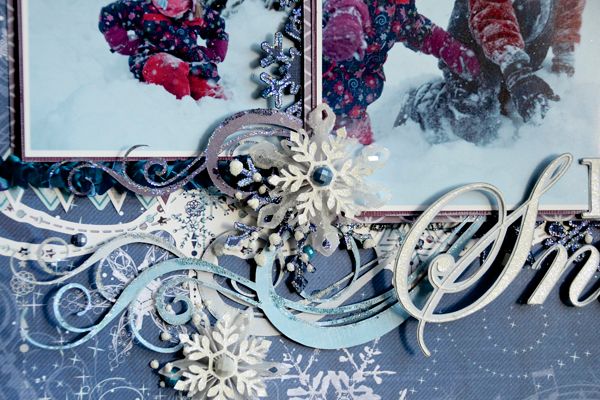
this is where the software really helped. i love layering flourishes and also love to change their sizes. i was able to play around with the direction, sizes and colours of the flourishes before i cut them out.
i had not tried cutting out glitter paper with my Cameo. i was totally impressed with the fine detail it mastered on my title. it's difficult to tell....but the white portion of the title is glittered cardstock.

this is the dimension i adore in paper scrapbooking.
i added the glitter, microbeads, dimensional paint and glass fragments here too. you can more easily see the glitter on the dimensional paint in this photo. i dabbed on the paint and sprinkled the glitter while it was still wet. even with the slight breeze from my heat tool, they still stayed stuck to the paint as it dried. i love it when techniques work out as you hope.
all the glitter is not so visible in this photo. as always glitter makes it difficult to take a clean photo too.
a few of the specific details about the creation of the snowflakes....
there were a couple of pre-cut vellum snowflake rosettes. very pretty and i love the vellum idea! they were cut from this Sizzix die:

Mini Snowflake Rosettes by Tim Holtz for Sizzix
you can also get a third version from another set. they are so pretty!

Snowflake Rosette by Tim Holtz for Sizzix
a hint when you assemble these...apply tape to the back side. scotch tape does the trick!
one of my favourite snowflake dies is Bianca Snowflake by Memory Box.

from the Silhouette Online Store i used:
snowflake set by Jamie
ID # 15119

let it snow phrase by Sarah Hurley
ID# 35449

abstract swirl flourish by Lori Whitlock
ID# 12736

i created my own snowflake frame using a few different snowflakes i had on file. here is a frame that is already made that is similar.
snowflake frame by Lori Whitlock
ID# 5129

thanks for visiting!
Roxanne, you mentioned using "dimensional white paint" on the above layout. Is the dimensional paint, Ranger liquid pearls? Love the "Let it Snow" layout....
ReplyDeleteThank you!
ReplyDeleteWe sell it at Urban. It is called Liquid Applique by Marvy Uchida. It looks cream in the tube...but it is actually white. It reminds me of the "puffy paint" from the 80's.
We sold a similar type of product a few years ago, but can't recall who made it or what it was called.
I'm looking forward to hearing about your latest project next time I see you! :)
Thanks Roxanne. I'll have to pick some up. I really like the effect.
ReplyDeleteRoxanne, this page is beautiful. You are so talented.
ReplyDelete