

during the Costco shopping trip this week i took a look at the kids' book section. this is meant for kids 8 and up, but i figured that Kiara could handle it with my help. for $8.99 i didn't take me longer than a minute to add it to the cart.
i did the first flower with her. showing her the page to look at to choose the flower, then finding the right page. which had ALL the pieces for that specific flower. she is actually very good at cutting paper, but this has her punching out the shapes. quicker!
later she sat down and worked on her own. i kind of expected her to run into some trouble and frustration. wrong. she was so quiet and relaxed as she worked. i also expected her to have some interesting flowers. considering it is a craft for girls twice her age...she did very well! there is now a bouquet of them arranged in a children's cup. she was at a birthday party on Saturday and created a vase. i told her it would be perfect to hold these flowers. those who know this zany girl of mine will laugh....her response? "or my toothbrush." hmmm.....must have been one of the items that came up for it's multitude of uses during the class?!!
her being content and hard at work, allowed me some more time to get my own craft projects worked on. i so love that my kids enjoy television, but can also be entertained in other ways.
on to my stuff....
Aidans' teacher is a scrapbooker. it was her first year teaching grade one. she also just returned from a maternity leave. and she was one of the first teachers to be hired to help be the original teaching staff in a brand new school. between work and her family, i know she has had next to zero time to herself! she has been another perfect and amazing teacher for Aidan. i wanted to give her a very special gift as a thank you.
but what?! i really don't know her style or anything.
as i thought about the different projects i've either created myself or seen out on display....i decided to try another version of the Graphic 45 Doorplate mini album. i haven't posted photos of it because it is the only one i have not finished! Diane Schultz, the owner and designer for Graphic 45 taught it to us at the retailers' convention back in March. it is one of the most amazing projects i have ever done. the spine of the album is one of the Graphic 45 doorplates.

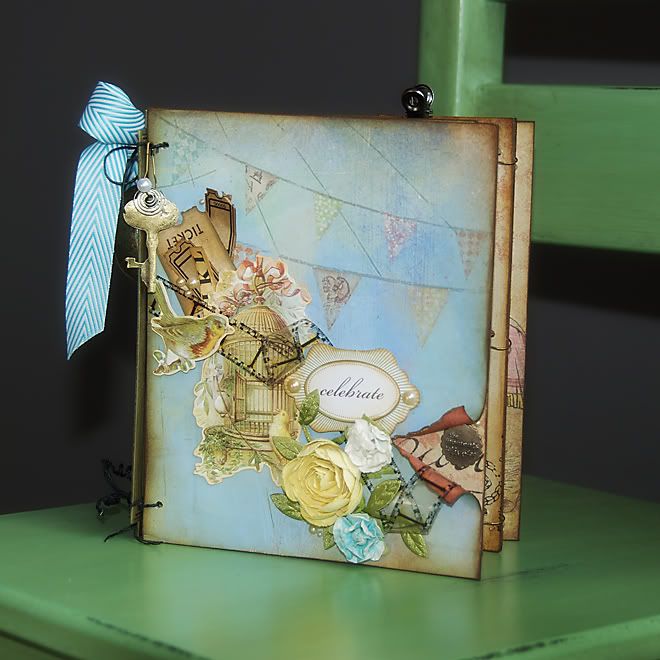
as much as i wanted to try the le cirque papers....i was not sure if circus was her style. i pulled a few different papers off the shelves to look over. Jaslyn and i agreed that the 'Afternoon Muse' collection by Glitz seemed a great style and colour for the project. soooo nice when the second opinion agrees with mine!
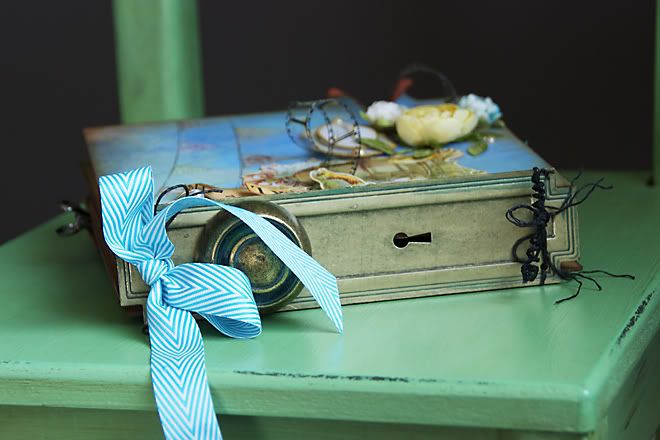
honestly i would love to have a library of books that have spines like this!
the assembly of the book is confusing at first. it was less difficult the second time around. but still confusing! just one of those projects that you have to be willing to be patient with and take your time doing. the pages themselves are just chipboard, covered with the patterned papers. but each page is attached to the doorplate. i think this was Diane Schultz design...not 100% sure. she has some incredibly gifted artists on their design teams too.
the cool part is that it stands up on its' own very easily too. right now it has made itself comfortable on my mantle above the fireplace. this will be one of those gifts that will be really hard to give up!
i'll share the inside photos throughout the week.
i wanted to use all Glitz...but the embellishments didn't fit the size of the album very well. it is only 7x6. i found that most of the pieces from the Pink Paislee Butterfly Garden ephemera pack worked better. i inked all the edges and tried to make them look more vintage than they already do. i still have nearly the whole package of their house of 3 tickets, so those found a home as well. Pat had a project where she used them and totally inked over them in brown...took that crisp look away and they looked sooo much older. that technique worked wonders here too.
the Tim Holtz filmstrip ribbon is another highlight - i think! the solid ribbons and laces i had picked out were just too heavy looking. the filmstrip ribbon added detail, but looked like it fit in with the design.
some prima flowers...when do those NOT look good?!
even some older Making Memories supplies. where would i ever be without their vintage garment pins? Jan discovered they worked great for inside the album too- which you will see later. i used one to hang the key and pearl at the top. isn't that key awesome?!
Maya Road mini-tickets...another staple in my supplies.
the hardest part was choosing which paper for which page. once i got past that stage, the rest just fit. the boring part was gluing the paper to the chipboard, sanding and then inking it. thank goodness for online movies! my craft room had a thin layer of dust over everything when i was done too.
here is a tip:
gluing paper to chipboard.....
when this first became popular (at least for myself) we used a glue stick. but then you had to have it sit under something heavy as it dried and set.
later i took some online classes and they used Mod Podge. it works too. but it is pretty wet, sometimes tears the papers and takes a long time to dry. it also has to be under something heavy...after it is dry.
then i used a gel medium sold by Golden. i prefer it over the Mod Podge.
now i use Multi-Medium by Claudine Hellmuth. it is a thicker consistency, dries super quick and works very well! it dries so quickly that sometimes it is dry before you get the paper on. i put the medium on the chipboard - seems to dry slightly slower. i can put it under something heavy right away. all of the methods tend to curl the papers as they dry.
i want to try the new Glue N' Seal from Ranger one of these days.
if you use any of the non-glue stick options i would recommend using the MATTE formulation. even when i am careful i always manage to get the stuff where it shouldn't go. with the matte, at least it blends with the papers i use and you can't tell. or i can give it a top coat and it isn't obvious. the "glossy" mod podge and gel medium i bought....totally shows! unless you want the shiny look.
off to work on the next project!
wowww wowwwww wowwwwww totally gorgeous!!!!!!!
ReplyDelete