
the goal was a photo of a completed project - that i thought i would never finish!
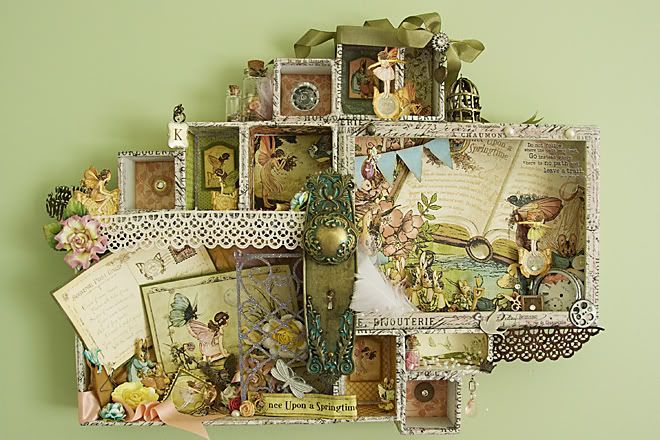
so you can see that i made it similar to Laura's, but not quite. her advice was to avoid any long straight edges. of course i heard that after i had glued all the little boxes together. i think it still works. and the four year old is happy. {not to mention the mommy-crafter!}
i found it a lot of fun to decorate the tiny boxes. they are small and don't really need a lot of time. the 2 larger boxes involved more planning.
the "lid" did not have a back, so i made one using a portion of the patterned paper. can you tell which one it was? it is the upper box, with the pocket watch parts.
i LOVE the butterfly tissue tape pack. i used half of the one roll on this project. i think i prefer it to the cream tapes now. which surprised me.
i am not sure if i would have put the doorknob plate in the same place again. i keep changing my mind on that detail! but i love the style of it and how well it works with the fairy papers.
my daughter loves Tinkerbell. Tinkerbell loves to collect bits and pieces to create new inventions. keeping that in mind, i added odd details and tried to keep the look eclectic. i have things hanging or propped up, or leaning, bent....
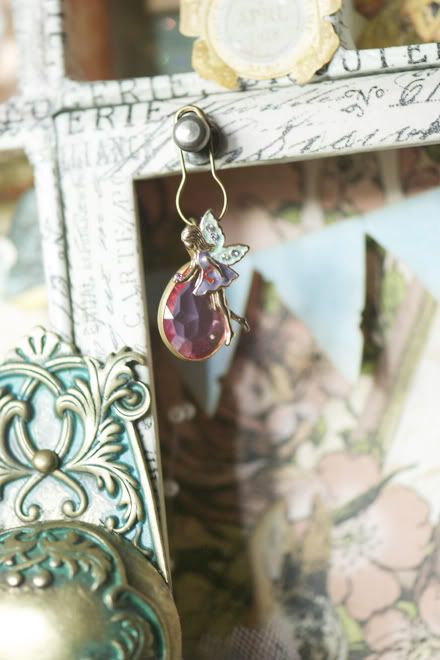
when she had just turned three, her Grandma gave her a fairy necklace. with a real chain. i think it lasted a week before the clasp broke. not 100% due to craftmanship! i kept the pieces...hanging the fairy from this garment pin and stashing the chain into one of the glass bottles.
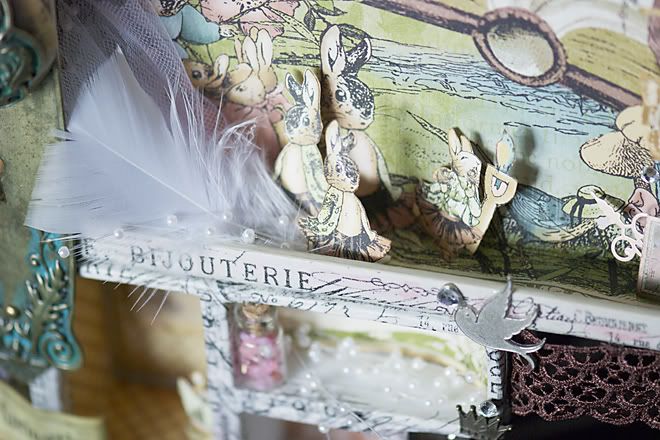
she also loves bunnies. {the cute ones. not the fruit tree and beautiful plant-eating killer bunnies in our community!} i cut them out and then glued them down so that they created some dimension in the box. i did this same technique with some of the fairies too.
i had an old Prima flocked gate for forever. the flock was brown and would have worked with the project. but! i had an idea to peel off the sticky cover on the back and add glitter. then i glued a pink gem to the top of one side to look like a finial. i think that is what they are called?
i also added some pink hilights to the tissue tape with Distress Stains. i just let it sit on the tape for a while and make a puddle. it dried and didn't wipe away.
i challenge you to give one of these three dimensional projects a try. these configuration boxes come in three sizes. Tim also sells a printers' tray type. if you are lucky enough to find a vintage wooden box, i am sooo jealous! however for a lower cost you can make your own.
7 Gypsies is also coming out with some new wooden shadowboxes. i do love the wood...gives it a classy touch. they have some coming out this fall that are deeper than their photo trays....more like the configuration boxes without the movable insides. you could also attach the wooden trays together and make a collage of them on a large wall. go here to see what the 2Gypsy Girls did with 6 of the photo trays. they designed theirs to showcase the new 7Gypsies collections. wouldn't it look great filled with personal memorabilia and photos that are too cute to hide in a box?
well, off to avoid mosquitos and enjoy one of our few nice sunny days.
enjoy your day!
your project is absolutely gorgeous!! What a lucky little girl and a very talented mommy!! Love it Roxanne.
ReplyDeleteRoxy Roller - I used the same paper for Olivia's 7 gypsies tray - but my goodness I love yours so much!!!! I so want to try this
ReplyDelete