
....and here June is over and the calendar reads a week into July!
June was a flurry of activity. music lessons ended. climbing lessons ended with a parent participation day. class year end field trips. times two!! more substitute teaching than i had expected {a very good thing, just kept life in an even faster pace}. school year end activities. then mix in the preparation for our first major camping trip in 3 years. we also can't forget the regular activities and responsibilities either.
my scrapbooking desk definitely was kept used and messy in June. which is good, because i can share some of my projects here!
for today, here is my layout for the July Urban Scrapbook Design Team....
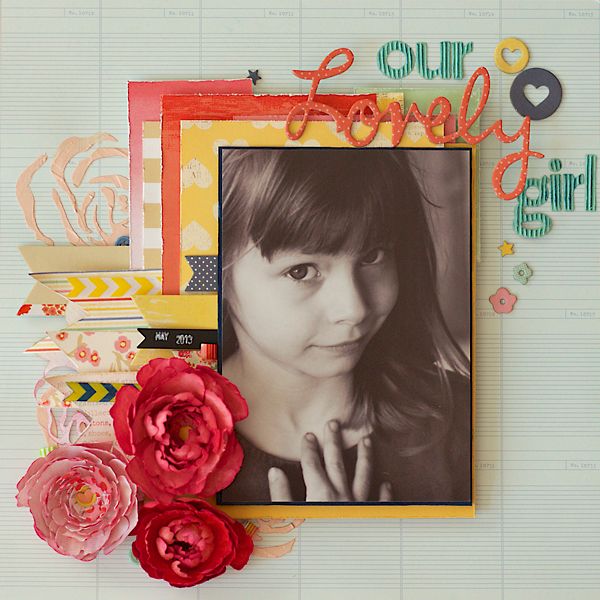
lately i don't usually use paper from American Crafts. even though i adore them. the colours and designs are so trendy and fun. sometimes it is good to step out of the box and get your creativity stretched. i used LOTS of layers.
for the bottom layer i cut out a flower stencil using a design i purchased from the Silhouette Store. {rose stencil and cut by Alaa 'K #12163} i deleted the outside square, then i made 3 copies of it and resized them to varied sizes. using some of the Viva Decor Champagne Modeling Cream mixed with some pink acrylic paint (Claudine Helmuth), i added it directly to the background page. both of those products are available at Urban Scrapbook.
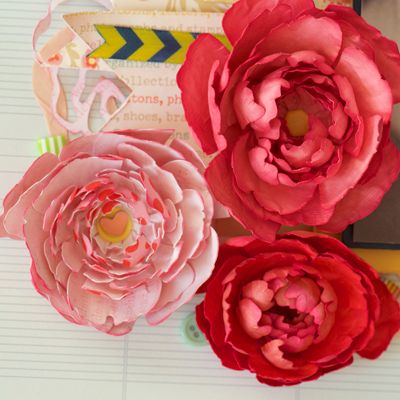
i decided to go all feminine this time. i cut 3 different sized flowers from 3 different papers for each flower. i used this simple design by Silhouette: 3D peony #40645. to add the curled look to each petal, you can use a variety of sized stylus' and a rubber pad. Martha Stewart, McGill and Sizzix have some great tools to use for this. Susan Tierney-Cockburn just designed some new dies for Sizzix that will allow you to create the most amazing flowers. check out this flower that Jan created last month. a few of the other Urban Girls have been making them too, but i can't find samples online to share with you. stop by Urban and check out the flowers in person.
i thought that the solid paper would have made my favourite peony....but it was actually the gold striped paper that was my favourite. i did heavily ink it, but the gold/cream variation really added more interest to each layer. a very happy surprise!
under the banners, you can see the rose cut that i cut out to match my stencil. it's a really cool design to have both the positive and negative shapes available.
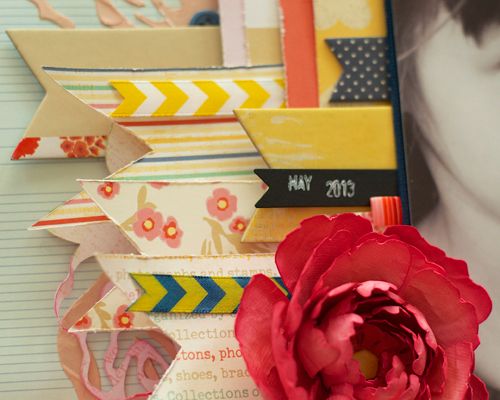
the chipboard stickers had so may banners, that i felt it totally necessary to add paper banners. i just tucked them in between my photo mat layers.
there were some chalkboard shapes too. i stamped the date on one of them using the White Faber-Castell PITT artist pen. have i mentioned how much i love the PITT pens?! they are big, and a must have for every scrapbooker.
since we had an entire spool of ribbon, i thought i would see how it did if i added ink to it. can you find my inked ribbon in the layers? the yellow portion was screen-printed and easily resisted my ink.
at the very end, i decided that the mint green letters blended too easily with the background paper i chose. i added a swipe of the blue ink to the raised stripes, and liked the contrast it added. "Lovely" was one of the chipboard stickers. i hope it is still attached to my layout! ha!! i added some Glossy Accents to the part that was attached to the yellow patterned paper. i know it will be fine when it gets slipped into the page protector...but hopefully it can handle 31 days hanging on a wall.
if you haven't done so yet, you must check out the designs the other girls have made. you can view them on the blog here or on the store website here.
on another note, my Year In Review classes are on a summer break. my next class is scheduled for the end of September. i will share the layout here when the class is ready for registration. check back here to see the design for the summer class i will be teaching.
No comments:
Post a Comment
Thank you for taking the time to comment!